Blue Sea Systems · 7184

Blue Sea 285-Series 60A Breaker wiring diagram

See the Blue Sea 285-Series 60A Breaker connection points and wiring example. Open the diagram in Crimp to add your equipment and plan the cables between them.

Open this example as a new project. Use your own parts and cable lengths to make the plan yours.

About this wiring example

Use the diagram as a starting point for your installation. Replace the example equipment and cable lengths with your own, and check the connections against your exact model's instructions.

Cable sizes depend on the connected equipment, current and cable lengths. Add those details in Crimp to size each run.

Show sizes in AWG

Wiring diagram

How the 285-Series 60A is wired.

Open this example in Crimp to use your own parts and cable lengths. Review the assumptions and installation notes as you adapt the circuit.

Blue Sea 285-Series 60A Breaker wiring diagram, positive and negative connections between the system bus and the unit, plus LOAD.
Edit this wiring example

Installation notes

Connections and installation requirements.

Guidance for this model, with sources linked beside the relevant advice.

Verified against the manufacturer's documentation (rev. 7184 official product specifications and 285-Series dimensioned drawing; no linked installation manual), checked 2026-10-01. Manufacturer documentation →

What does the 60 A rating mean?

The 7184 is a surface-mounted, manually reset 60 A thermal breaker for circuits up to 48 V DC. Its manufacturer specification gives 3000 A interrupt capacity at 48 V. The 60 A value is circuit protection, not the equipment’s operating current; do not use it as the load in an energy budget.
How is it connected?

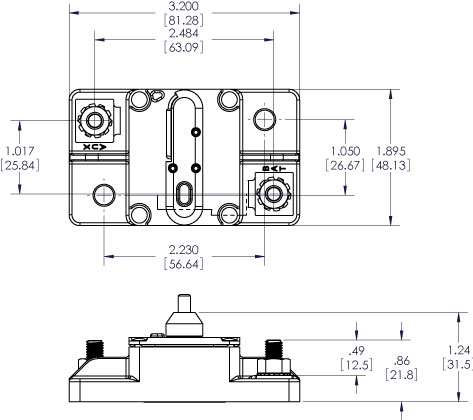
Install it in the protected positive feed and keep the source-side unprotected cable appropriately short. It uses M6 studs, accepting 1/4-inch ring terminals, with 5.65 Nm published stud torque. Support the cables so their weight does not twist the studs or case. The official dimension drawing supplies mounting dimensions; Blue Sea links no separate installation manual for this SKU.

How do you check suitability?

Check load current, conductor ampacity, system voltage and available fault current independently. A thermal trip is affected by temperature and duration; it is not a precision current limiter. Do not assume its interrupt rating is sufficient for every lithium bank merely because the operating voltage is 12 V.

What happens after a trip?

The lever displays the open condition and the mechanism is trip-free. Find the overload or wiring fault before resetting. Blue Sea permits switching use but excludes switching into high-inrush loads; use an appropriate disconnect/precharge arrangement where required. Repeated tripping should prompt current, connection-temperature and cable checks, not an automatic upgrade to a larger breaker.

How is the installed breaker recorded?

Set the protected cable’s protection override to 60 A to record this hardware rating. The component’s name and switch symbol alone do not establish a 60 A protection setting in the planner. Check the actual breaker’s interrupt rating and trip curve separately; the software does not simulate its thermal trip timing.

Build it out

Connect it to the rest of your system.

Add 7184 to your diagram, then connect your batteries, chargers and loads. Crimp calculates cable sizes and checks the connections as you draw.

Every cable you draw there is sized against ABYC E-11, from the same tables as the reference on this page.

Technical reference

Specifications, terminals and supporting parts.

Check the model, ratings and connection points against your own unit before choosing installation hardware.

Catalog specification

Compatible systems
12 V / 24 V / 48 V

Supporting parts

  1. A lug or terminal to match each post on the part
  2. Strain relief and boots so nothing chafes or shorts
  3. Cable and fuses sized once the whole system is drawn

Check stud sizes, fuse type, run length and how warm the space gets against the gear you actually have before you order.

Terminal map

Catalog connection points, current direction and planning limits. Check the manufacturer's pinout and connector ratings before installation.

LINE

in

positive · bidi

60 A

LOAD

out

positive · bidi

60 A

Method & provenance

Where the specifications and sizing come from.

Manufacturer specifications describe the equipment. Crimp calculates cable results from the circuit and assumptions you enter.

From the maker

What the catalog says

Manufacturer, model, ratings and which terminal does what come from the catalog. A newer revision, or the nameplate on the unit in your hand, can say something different — when it does, the nameplate wins.

ABYC E-11

What Crimp worked out

Sized against ABYC E-11. Boats built to UK or EU rules answer to ISO 13297 — check these figures against it before you build. The run length and the current above are what drive the result. Crimp doesn't know how warm your space gets; draw the cable inside an engine-bay zone on the canvas and it sizes for the heat.

Read how the sizing works

Next step

Plan your installation with 285-Series 60A.

Open this example as a new project. Add your equipment and cable lengths, then review the sizing and checks for your setup.